Table of Contents
Creating and editing Services
Creating and editing services is important in keeping your JRNI account relevant to your day-to-day business operations.
In this article you will find instructions on how to create and edit services through your JRNI account.
Creating a service
Services can be created at the child and parent level, though it is recommended they are created at parent level to allow for them to be assigned across multiple locations when required. Services created at parent level will appear at child level but not vice versa. They follow the same format so the steps below apply to both.
- Log into your JRNI account at either the parent or child level.
- Using the left-hand menu, navigate to Your Business > Services.
- In the top right you will see Create new service. Select this button.
- You then must choose either (configuration dependent):
- Create Hour/Minute Service
- Create Variable Time Service
A Hour/Minute Service refers to a service that can only have one time allocated to it (e.g., 30 minute beauty appointment).
A Variable Time Service refers to a service that could have multiple time periods allocated for the customer to choose from (e.g., meetings with the option of 2, 3, or 4 hours).
- You then need to fill out the Create new service fields.
- Name: Give your service a suitable name (e.g., Beauty Appointment, Mortgage Meeting).
- Description: Give a brief description of the service.
- Method: Specify how you want the service to be performed (in person, video or phone).
- Disabled: State whether you want the service to appear as being bookable to customers.
Note: Refer to the Disabling a service section within this article for more information.- Duration:
- Hour/minute service: State the single/fixed duration of the service.
- Variable time service: State the multiple possible durations and prices for each if relevant. Select Add another to add additional service durations.
- Listed duration: How long you tell the customer the booking lasts. For example, the duration might be 60 minutes, however, you might want to display the duration as 45 minutes on your customer journey. This allows you to account for time outside of delivering the service, where the customer does not need to be present (e.g., paperwork or clearing away equipment).
- Reference: An alternative name for a service that can be used by API integrations. This is useful when the service name might change. For example, you might use the reference personal_shopping for a service named Personal Shopping. For most configurations, this can typically be left blank.
- Spaces: State how many people the service is available for at one time (e.g., if set to 2, that single time slot with a staff member can be booked by 2 separate customers).
- Group (configuration dependent): This is a legacy feature and should be left blank.
- Category: Apply a category created by your JRNI account manager. Categories are another way of grouping services.
- Time settings: Use these to specify when the service can be booked/canceled, and any dates when the service should stop being available for bookings.
- Minimum/Maximum bookings/cancellations: These settings determine who can book and how much time in advance the service can be booked. Cancelation settings allow to choose how close to the appointment a customer can cancel it (for example, you can set it so they can’t cancel the appointment less than one day in advance).
Important: As a general rule, the Min/Max options should never be set to 0. When left at zero, if the time is minutes, it will be treated as 1 minute. If set to 0 days, the minimum advance time will be treated as 1 day or 24 hours.- Disable dates: Disable before/after dates allow you to have a service unavailable on the calendar before/after specified dates.
- Queue duration & disabled: If using JRNI's Virtual Queueing capability, use these settings to enable/disable the service from queueing, and apply a different duration for the service when available in a queue.
- Pricing: Set a price for the service. Here you can also set a price change after a set date.
- Any user-defined fields that are assigned to a service will be shown here, at the end of the process of creating a service.
Note: User-defined fields can be found under Customize in the left hand menu. Therefore, these questions will only appear while creating a service if first created in User-defined fields and assigned to Service.
Advanced
When creating a service, there are a few advanced creation fields that can help to organize your bookings more effectively.
- Log into your JRNI account at the parent or child level.
- Navigate to Your Business > Services > Create new service > Advanced.
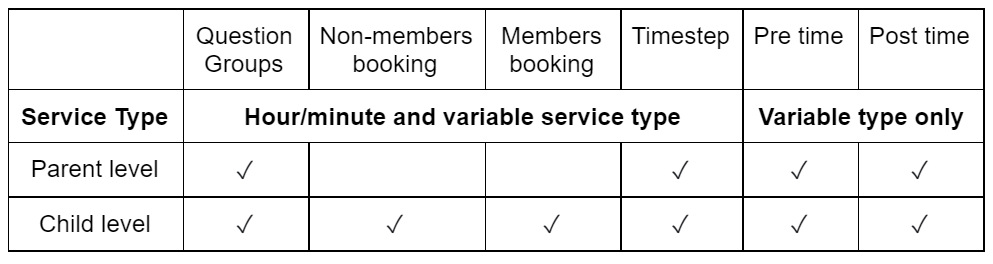
Depending on which level you log in at and which type of service you are creating (hour/minute or variable), different options will appear on the Advanced page (see the table at the end of this section to see which fields appear for which levels and service types).
- Fill out the advanced creation fields:
- Question groups: Assign a relevant question group to the service (for more information refer to the Booking Questions & Question Groups article).
- Non-members booking: States which levels of the booking can be made by customers without an account.
- Members booking: States which levels of the booking can be made by “members” (customers that have an account).
- Timestep: The booking time step states the booking intervals for your service that will appear when making a booking. For example, if your timestep is 1 hour, the available booking times will appear as 9am, 10am, 11am, etc.
Tip: Timesteps should be set to the shortest service time to allow for the most efficient use of booking time possible. For example if you have 30 minute services as well as 1 hour services, setting your timestep at 30 minutes will allow you to book both service lengths. But if there is a half an hour slot between two 1 hour services, you have the option to fill it with a 30 minute service.- Pre time: You can select an amount of time that will block out before any appointments.
- Post time: You can select an amount of time that will block out after any appointments.
- Fixed start times: Typically, service start times will adjust to make the most of the available time. Enabling fixed start times ensures the start times always occur at the same regular intervals but will result in more unused gaps of time.
Please note: Fixed start times are only available when using the new scheduler
Assigning a service to multiple locations
You may want to assign a service to multiple locations if the branches offer the same services. Assigning a service is done at the parent level.
- Log into your JRNI account at the parent level.
- Navigate to Your Business > Services from the left hand menu.
- Find the service that you want to assign and on the right hand side hover over Actions.
- From here, select Companies, which will produce a list of available locations to assign the service to.
- You can then use the tick boxes to select the locations that you wish the service to be available in, as seen below.
- Once you have made your selections, select Save and the service will then be found in those selected child locations.
Editing a service
You may wish to amend the price, duration, or other details regarding a specific service. Follow the steps below to make amendments to a service.
- Log into your JRNI account at the parent or child level.
- Navigate to Your Business > Services on the left hand menu.
- Find the service you want to edit and select Details on the right hand side.
- You will then be taken to a page that displays the service information. Scroll down to the bottom and select Edit.
- You will then be taken back to the Creating a Service stage. Refer to the Creating a Service section above for details on each step.
- Once all edits have been made, select Save at the bottom.
Adding a service image
To add an image to your service that will be shown on the customer booking journeys, navigate to the service profile of a previously created service as described in the "Editing a service" section above.
Under Details/Basic you will see the option to upload an image
Please do not exceed the max file limit of 2MB. We also recommend uploading a square 1x1 dimension image as this is the display format on the booking journeys.
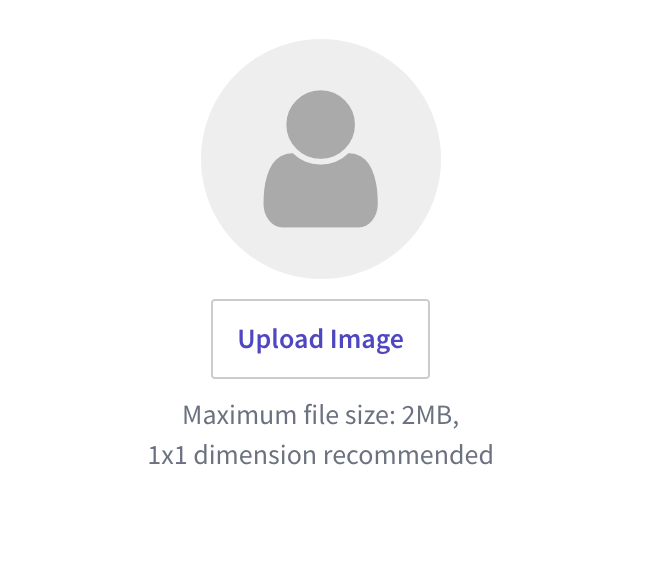
To update or delete an image simply click on the "Remove image" button underneath the photo (and reupload a new image).
Disabling a service
Disabling a service allows you to hide the service from being shown within the customer booking journey. You may want to disable a service if it is temporarily unavailable, for example.
Disabling a service is a changeable field within creating/editing a service. When in the creation/editing process, which are identical, just amend the drop down answer to reflect whether you want to disable the service within the customer booking journey.

Once you have disabled a service, it will show in the list of services in a yellow box.

The service will also show as “disabled” when you create a booking as a staff member, as shown below.
Related articles
Still have questions?
If you have any further questions about creating or editing services, please contact JRNI Customer Support, who will be happy to help.