Table of Contents
Creating and managing resource availability
With JRNI, resource availability is determined by shifts and shift patterns created on each resource profile. Once set up, this availability will primarily determine when and which resources can be booked alongside staff and services.
Creating shift patterns for a resource
Manage the availability of each bookable resource using shift patterns via the Schedule tab on the resource profile. Resources, including their availability, are set up at the Child level.
- Log into your JRNI account at a Child level location.
- From the left-hand menu click Your Business > Resources.
- Click into any resource to open the resource profile.
- Click the Schedule tab.
- Click Create schedule (if creating for first time), and/or the Create Shift Pattern button.
- The schedule editor will open for you to complete:
- Start date: the date the shift pattern should commence.
- Start time: the specific time the resource availability will start. Use the AM/PM options to swap between mornings and afternoons.
- End time: the specific time the resource availability will end.
- Repeats: how often the shift pattern should recur; weekly, daily, sporadically.
- Interval: the number of intervals between weekly or daily shift patterns, commonly used for “rotating” shift patterns. For example, if your shift pattern runs daily/weekly and you set the interval to 1, it will repeat every day/week. Set the daily/weekly interval to 2 and it will repeat every other day/bi-weekly, and so on.
- End: when the shift pattern should end; never, specific date, after x occurrences.
- Click Save when complete.
The new shift pattern will now appear on the same resource Schedule page, and also on the Resources Calendar tab (availability represented in gray as below).
The resource will now be bookable alongside any staff and services that were assigned to it during resource creation. This can be amended on the Who & What tab on the resource schedule.
Creating multiple shift patterns
If the resource is available at different times depending on the day, this can be reflected by creating multiple shift patterns for different days.
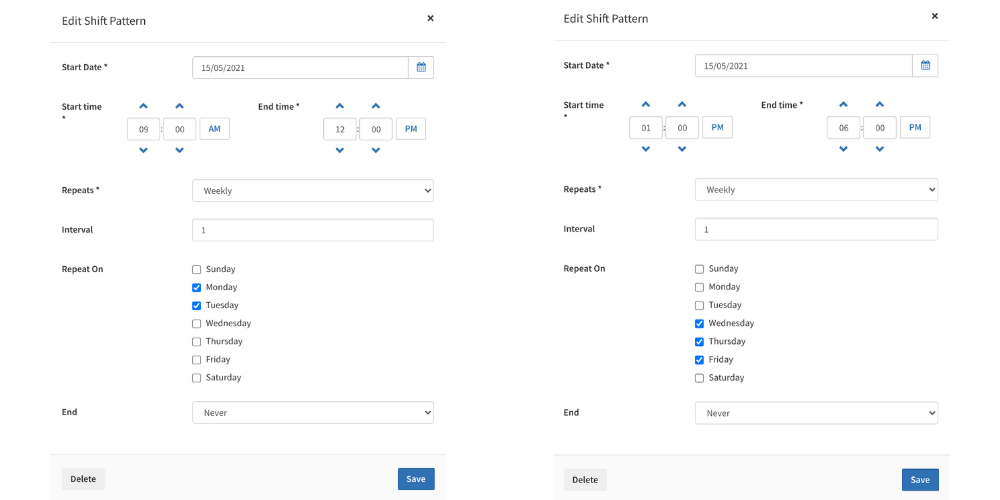
The example below shows one shift pattern which runs from Monday - Tuesday, 9am - 12pm. And another which runs Wednesday - Friday, 1pm - 6pm.
Below displays an example set up of each of the above shift patterns.
Another common example is creating one shift pattern for weekdays, and another for weekends. A similar setup can be done as above, by instead selecting Monday - Friday for the one shift pattern, and then selecting Saturday and/or Sunday for the other.
Individual and ad-hoc shifts
Edit individual shifts within the shift pattern if you require a one-off differentiation from the standard pattern. This allows you to change the resource availability for a particular time or day, without affecting the rest of the shift pattern.
- Navigate to the Schedule tab on the resource profile, via Your Business > Resource > click a resource.
- On the Schedule tab, click onto any existing shift pattern / slot.
- A new window will appear for you to choose whether to edit the individual Shift or whole Shift Pattern. Select the Shift option and click Submit.
- Update the Start and End times to reflect the new individual shift requirements.
- Click Save to complete.
Editing and deleting shifts and shift patterns
If you need to amend a particular shift or a recurring shift pattern, follow the steps below:
- Navigate to the Schedule tab on the staff profile.
- Click onto any shift or shift pattern.
- Choose whether to edit the individual Shift (ad-hoc availability) or Shift Pattern (recurring availability), followed by Submit.
- On the shift editor, either update and Save your new shift / shift patterns settings, or click the Delete button to remove it entirely.
- If deleting a shift or shift pattern, a final screen will ask you to confirm your changes before permanently removing it.
Making a resource continuously available
You can set resources to "never booked" so that they are always available for appointments, regardless if this conflicts with other bookings for the resource. This may be useful in cases where you have a “generic bookable resource” set up, whereby you can manually transfer any bookings over to other resources.
You can use this setting upon adding a new resource, or you can simply edit an existing one. In both cases, use the Never mark as booked option in the Details tab on the resource profile. Here’s how:
- Log into your JRNI account at Child level.
- Click Your Business > Resources from the left-hand menu.
- Locate and click a resource from the list displayed, or use the search bar.
- On the Details tab, scroll down and click the Edit button.
- Select the checkbox next to the Never mark as booked option.
- Click the Save button.
The resource will now always appear as available on the calendar, even if it has conflicting bookings.
Making a resource unavailable
If you need to remove availability from the resource for any reason, you can do so manually by following the steps above to Edit and delete shifts and shift patterns.
If the resource will only be unavailable for a short period of time (e.g., cleaning, decorating), it may be more efficient to block out time on the resource calendar instead.
Alternatively, if the resource will be unavailable for an extended period of time, you can disable the resource from the customer booking journey. The resource would remain visible on the staff calendar in Studio however, and could still be booked internally if required.
Still have questions?
If you have any further questions about creating and managing resource availability, please contact JRNI Customer Support, who will be happy to help.