Events setup and config
 Updated
by Lorena
Updated
by Lorena
In this guide, we explain how staff can create events, cover the different types of events, give insights into event templates, and show you how to manage attendees.
Events
How to access
Events can be accessed by navigating to Studio → Your Business → Events
General
The Events feature is a powerful tool that enables users to create and manage various types of events, including single events, recurring events, and multi-location events. Users can create templates for future reusability, build stunning landing pages, manage attendees, and more!
Settings
Under Studio → Settings → Advanced Settings you can enable Events for Studio

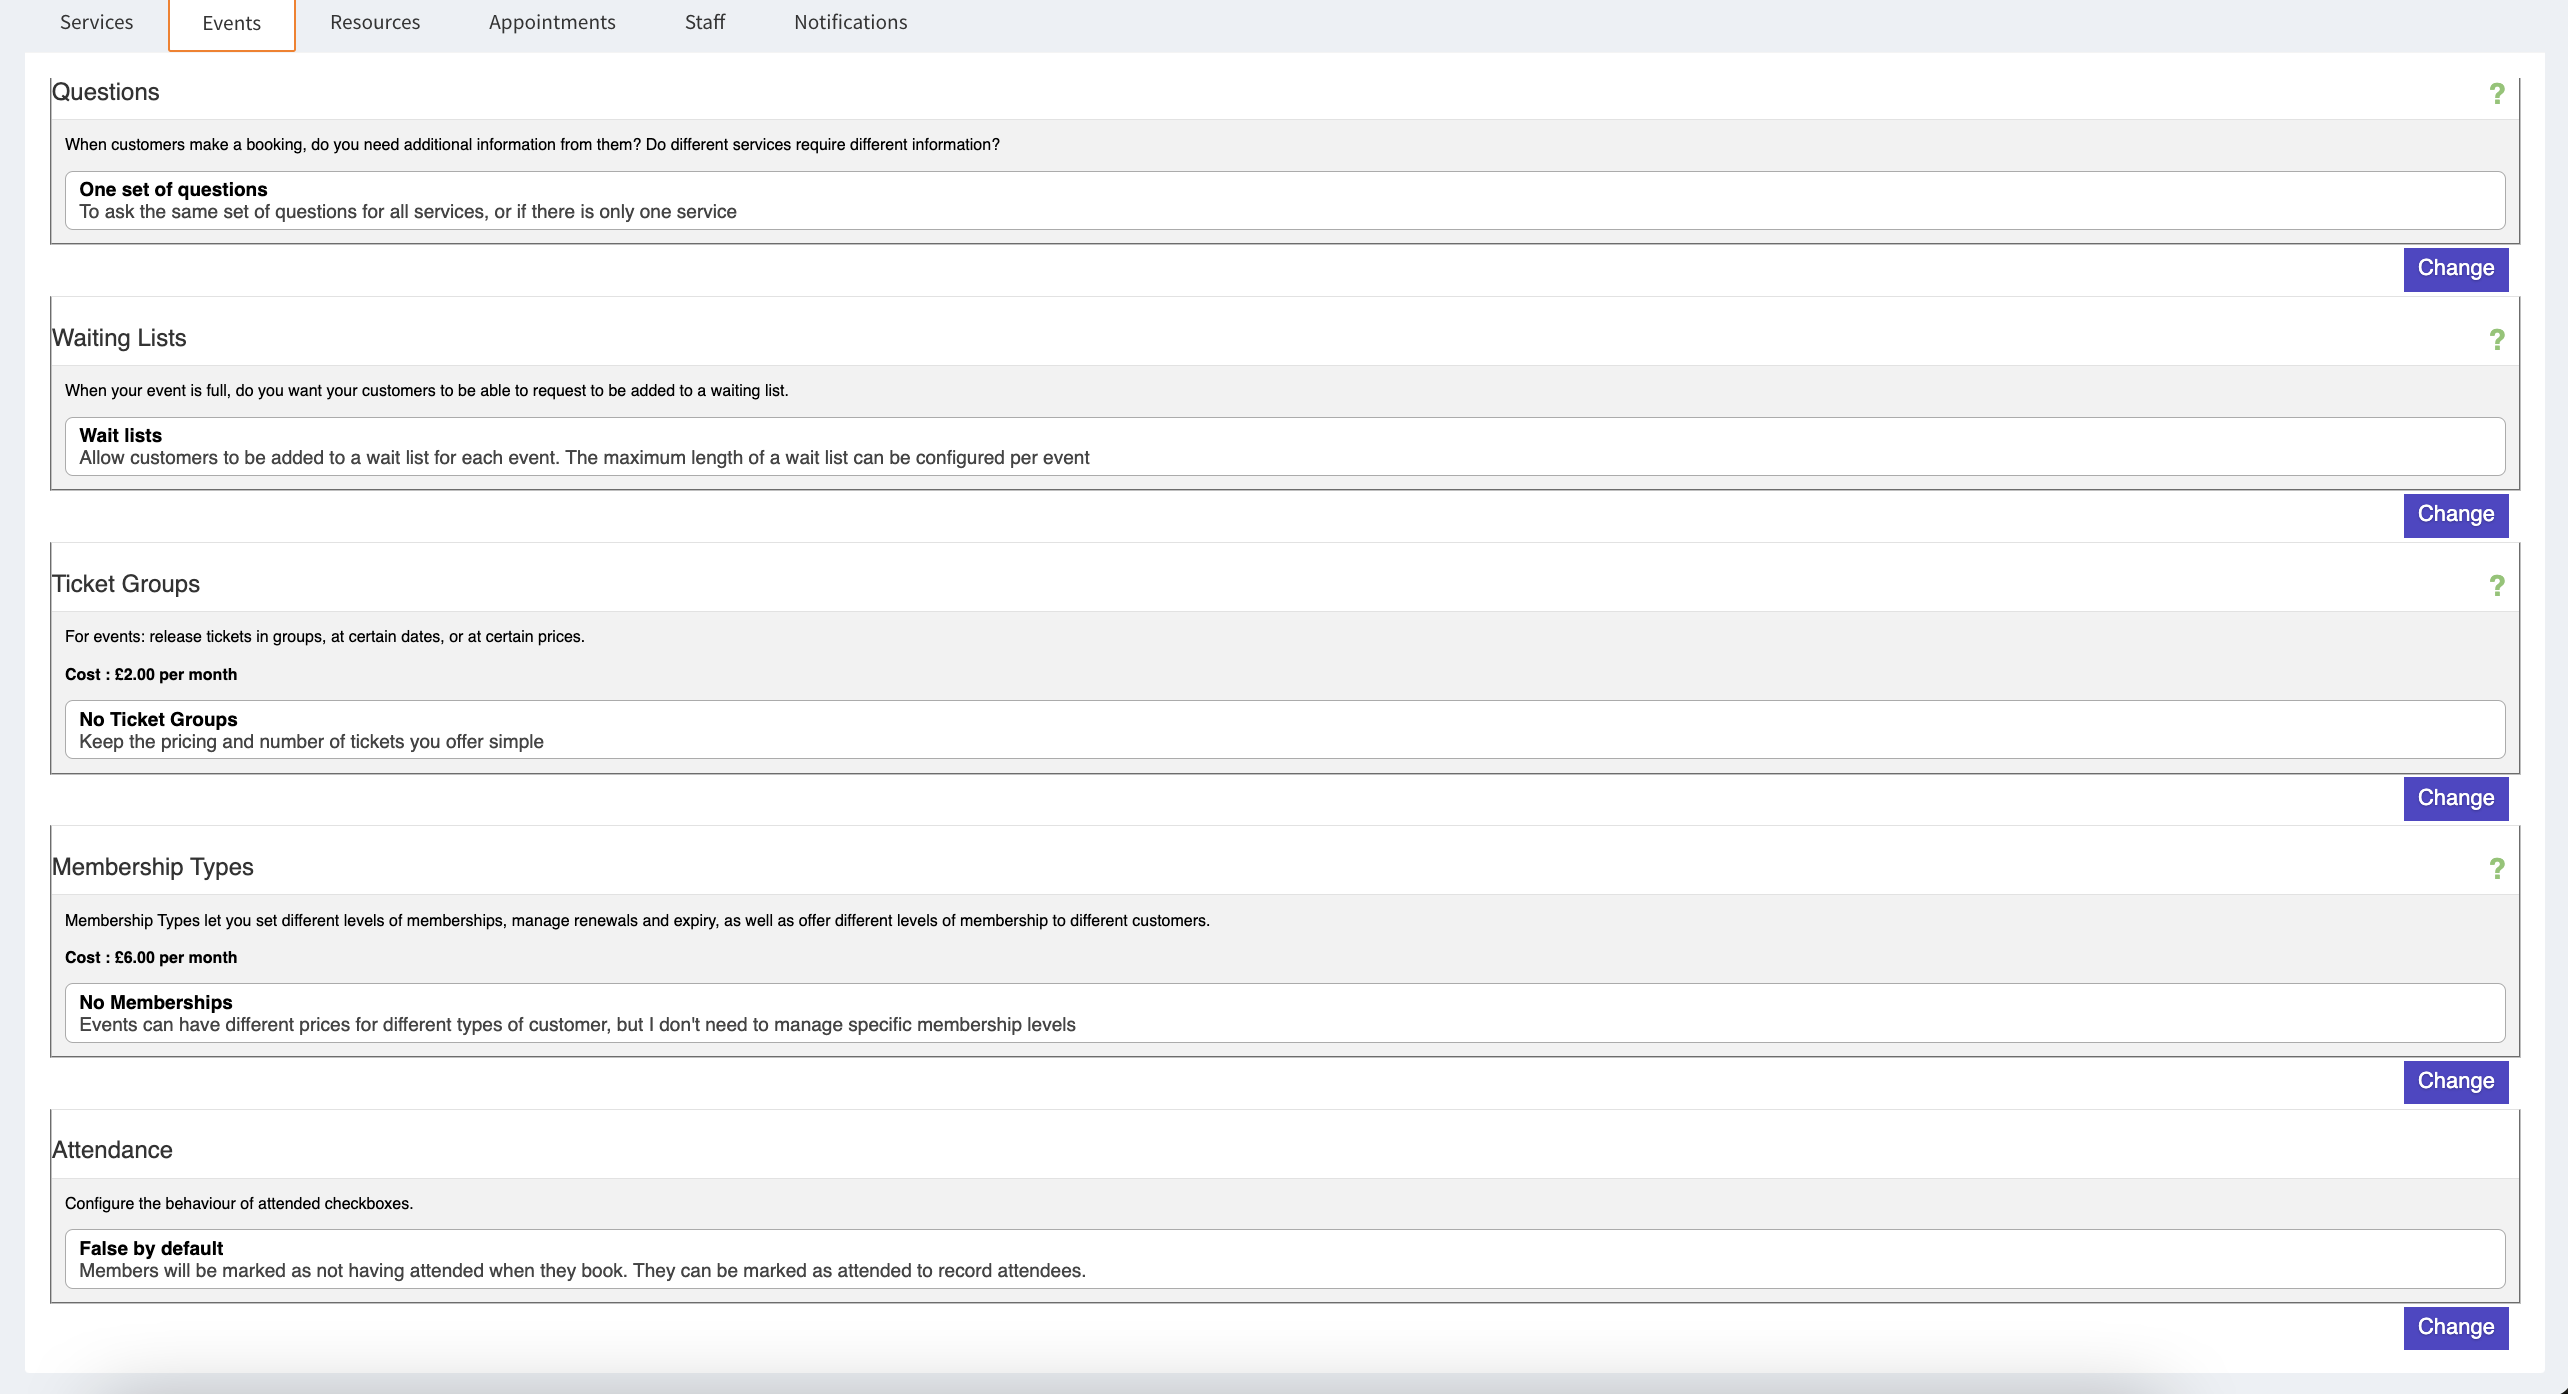
Studio also allows you to configure some of the base settings of the events module. Under Studio → Settings → Basic Settings →Events you can set the following:
- Questions: Set if no, one, or multiple sets of questions should be answered by a customer when they sign up for an event
- Waiting list: Can be turned on or off. If enabled, it allows customers to add themselves to a waiting list if an event is fully booked. In the configuration of the single event, you can also set how many places are available on the waiting lists and add waiting customers as attendees.
- Ticket Groups: Can be turned on or off and allows the release of tickets in groups, at certain dates, or at certain prices.
- Membership types: Can be turned on or off. Membership Types let you set different levels of memberships, manage renewals and expiry, as well as offer different levels of membership to different customers.
- Attendance: Sets the default state of event attendees - either marked as not having attended by default, so that you can mark them as attended manually when the event starts, or the other way around to only mark those who have not attended.
Types of Events
Single events
Single events are single, standalone events that occur at a specific date and time. Within the creation flow of a single event, you can also set it to multiple days.
Recurring events
Recurring events are events that happen multiple times, such as weekly or monthly. Users can customize the frequency and duration in the events settings.
Multi-location events
Multi-location events are events that take place in multiple locations simultaneously or at different times. Users can create a single event with multiple sessions or multiple events with different locations. Attendees can choose the location and time that works best for them when registering.
Setting up an Event
There are two ways to set up events based on your requirements. Users can create an event template that can be used to create similar events, or they can create an event directly.
Event Templates
The purpose of event templates on the JRNI platform is to allow you to create consistent events across locations that can be created quickly and simply.
Creating an event template
To create a template, there are two options:
1. Navigate to Studio → Your business → Events → Templates tab, and click on the ‘Create new’ button.
Fill out the form and click on ‘Save’.
- Name: Name the template that you would like to create
- Description: This is the short description of the event, shown on the event cards on the events overview page
- Long description: This is the longer description of an event, shown on an event landing page
- Session Type: Note, we only support Single Events on the journey of the new event at the moment
- Event Group: This is the group that would like to assign this event to
- Start Time: This is the time when the event will start
- Duration: This is the duration of the event
- Price: This is the price of the event (leave blank if it is a free event)
- Spaces: This is the number of tickets or spaces for the event
- Max bookings at a time: The maximum number of bookings a single customer can make
- Minimum time in advance: This is the minimum amount of time prior to an event, that a customer will be allowed to register for it
- Minimum cancellation: This is the minimum amount of time prior to an event, that a customer will be allowed to cancel the registration for it
- Question set: This allows you to set a group of questions you would like to ask upon event registration
2. Create a new event (or select an existing event). Once created, go to edit the event (Events settings tab), scroll to the bottom of the screen click on the "Copy to a template" button, review the template and click on the "Update template" button at the bottom of the screen to save it as a new template or update an existing template from that event.
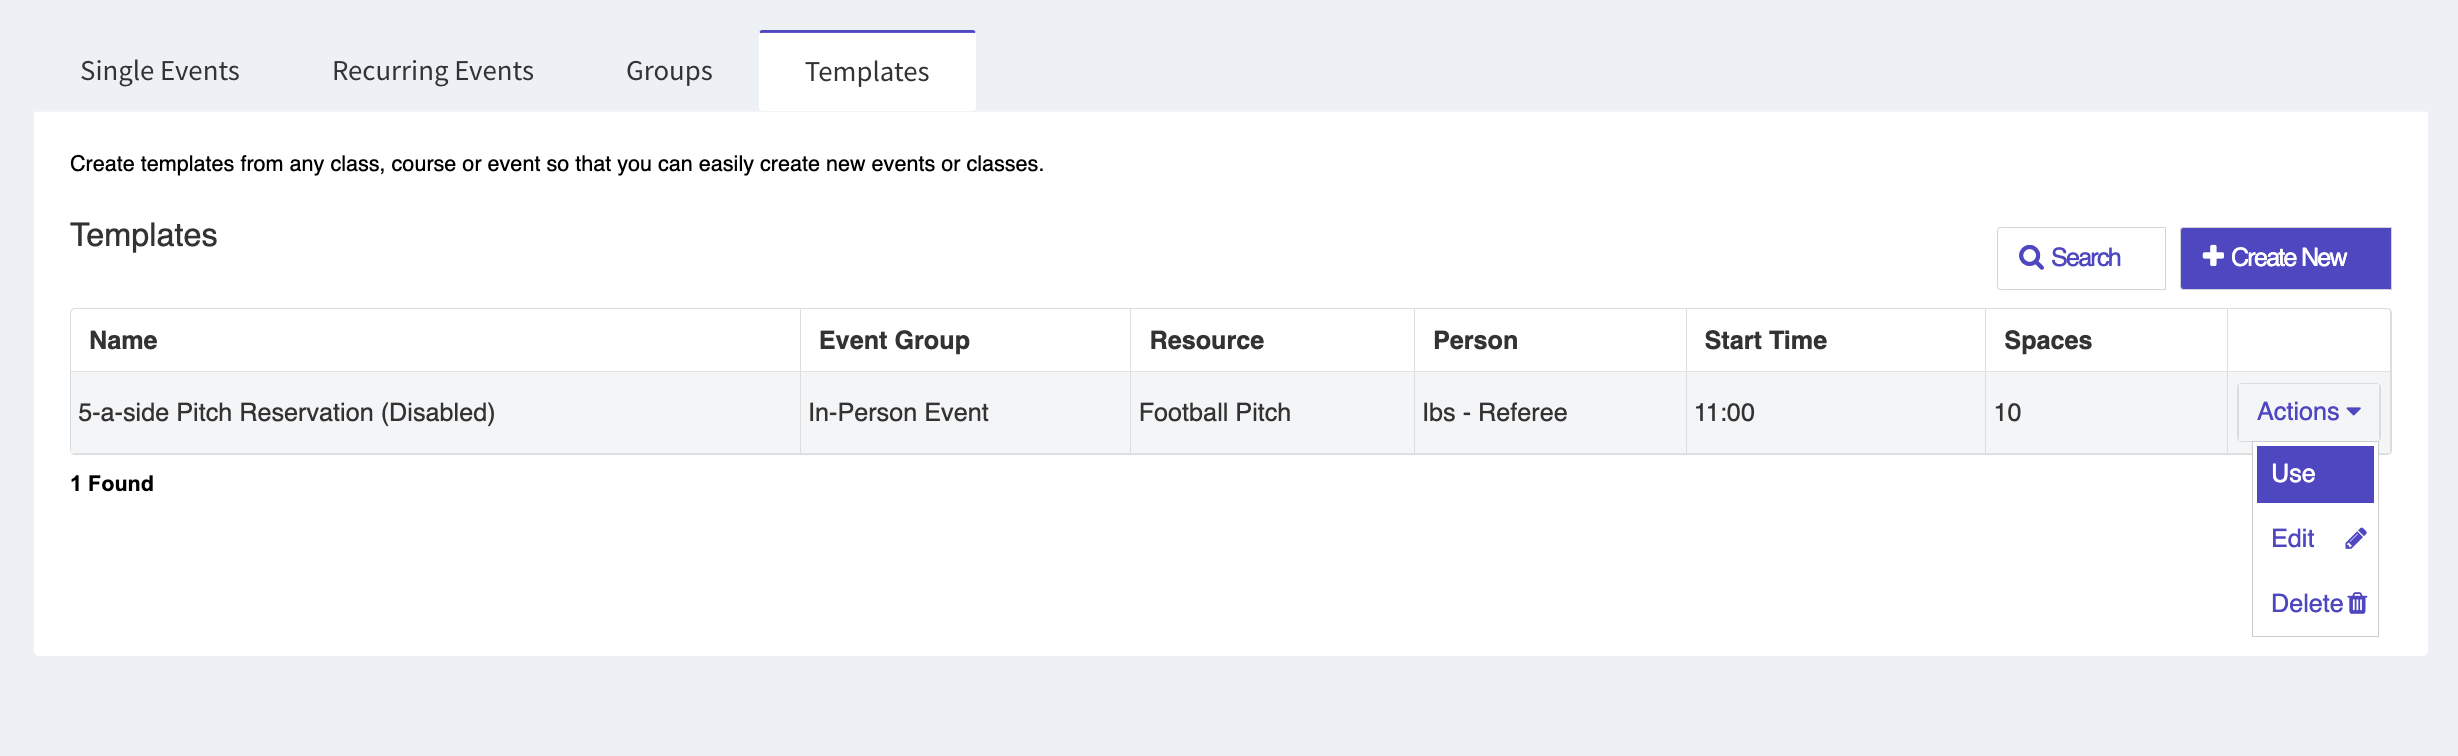
Using an event template
To create an event using a template, open the templates list, click on ‘Actions’ corresponding to the template that you want to use, and click on ‘Use’.
Creating an event
To create an event
- Inside Studio, navigate to Your Business → Events
- Click on the "Create" button. This will direct you to the events creation form
- Event details: Enter the event title and description. Upload an image by clicking on the upload image button.
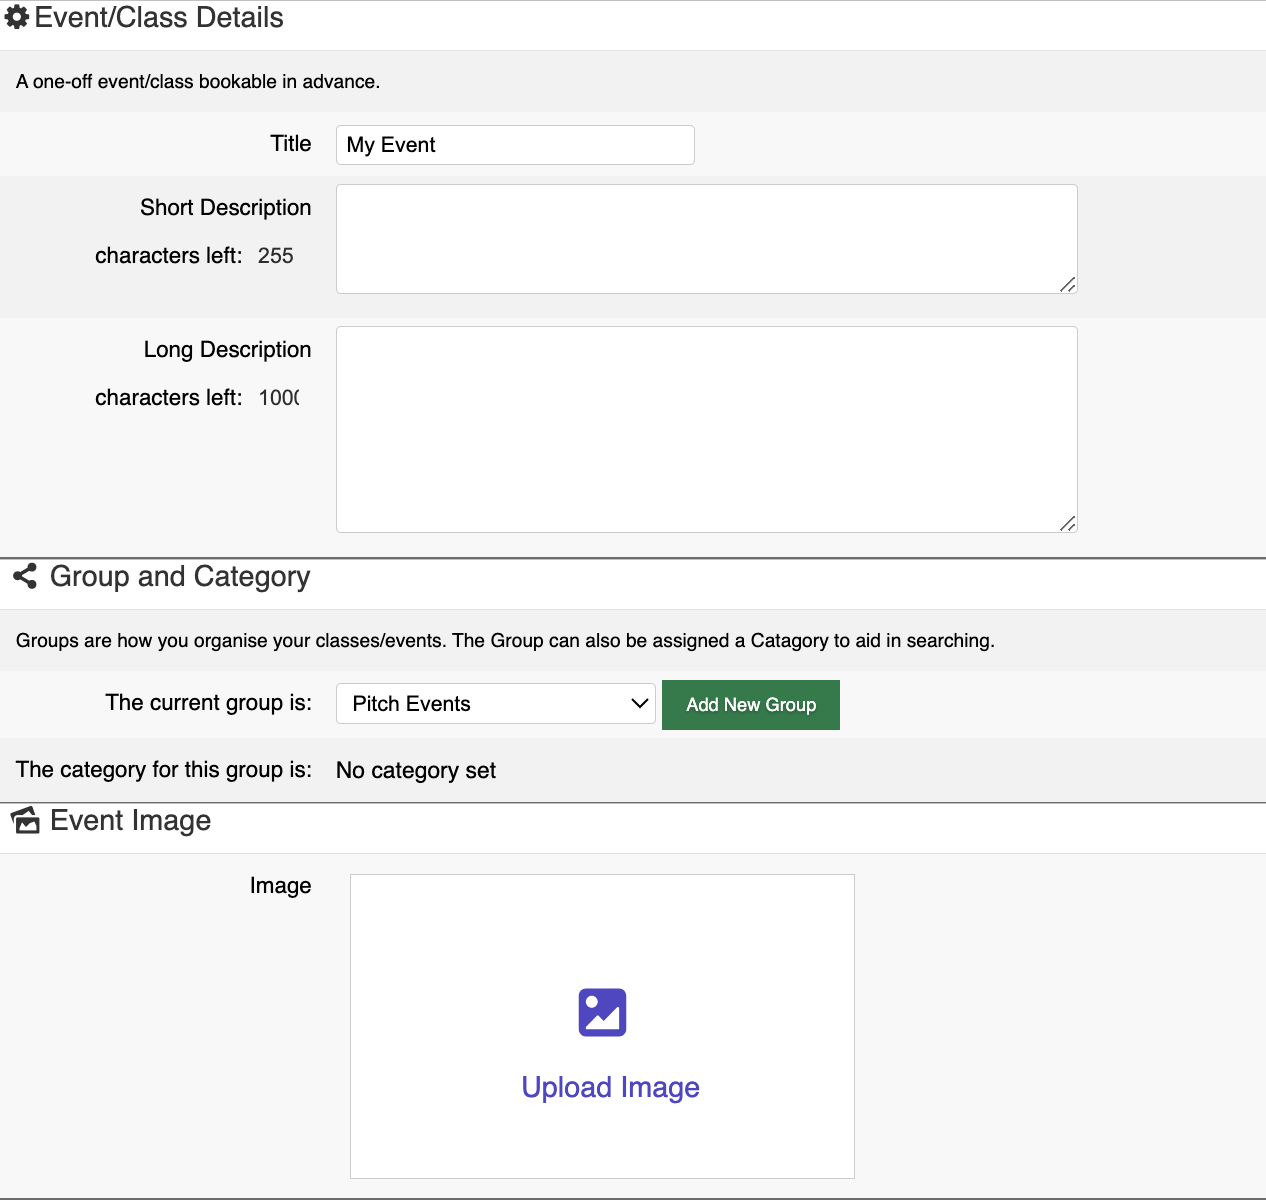
- Group and Category: To make it easier for your customers to find the event they are interested in the events overview page of the events booking journey, you can select an event group. Groups-creation is explained in the next section of this guide. The groups can further be collected under a category. To add a group click on "Add new Group" button and fill in a title - the group will automatically be created when the event is created.
Categories can be selected by clicking the "Add new Group" button and then clicking on "Set a Category to aid searching of this group". - Image Here you can upload a descriptive image of your event that will be shown in the events booking journey. Supported formats: Jpg, Jpeg, Png, svg. Image aspect ratio: 16 / 9, Max resolution: 480 x 270 px, Max recommended size: 300KB.
- Date & Time: You can set up an event as single-day or multi-day event. Optionally, in the advanced settings, you can provide a custom start time, and duration, which will be included in the registration confirmation email sent to attendees. If you wish to customize the date, time & duration in the confirmation email, you can enter your custom text in the ‘Complete Custom Date, Time and Duration’ field.
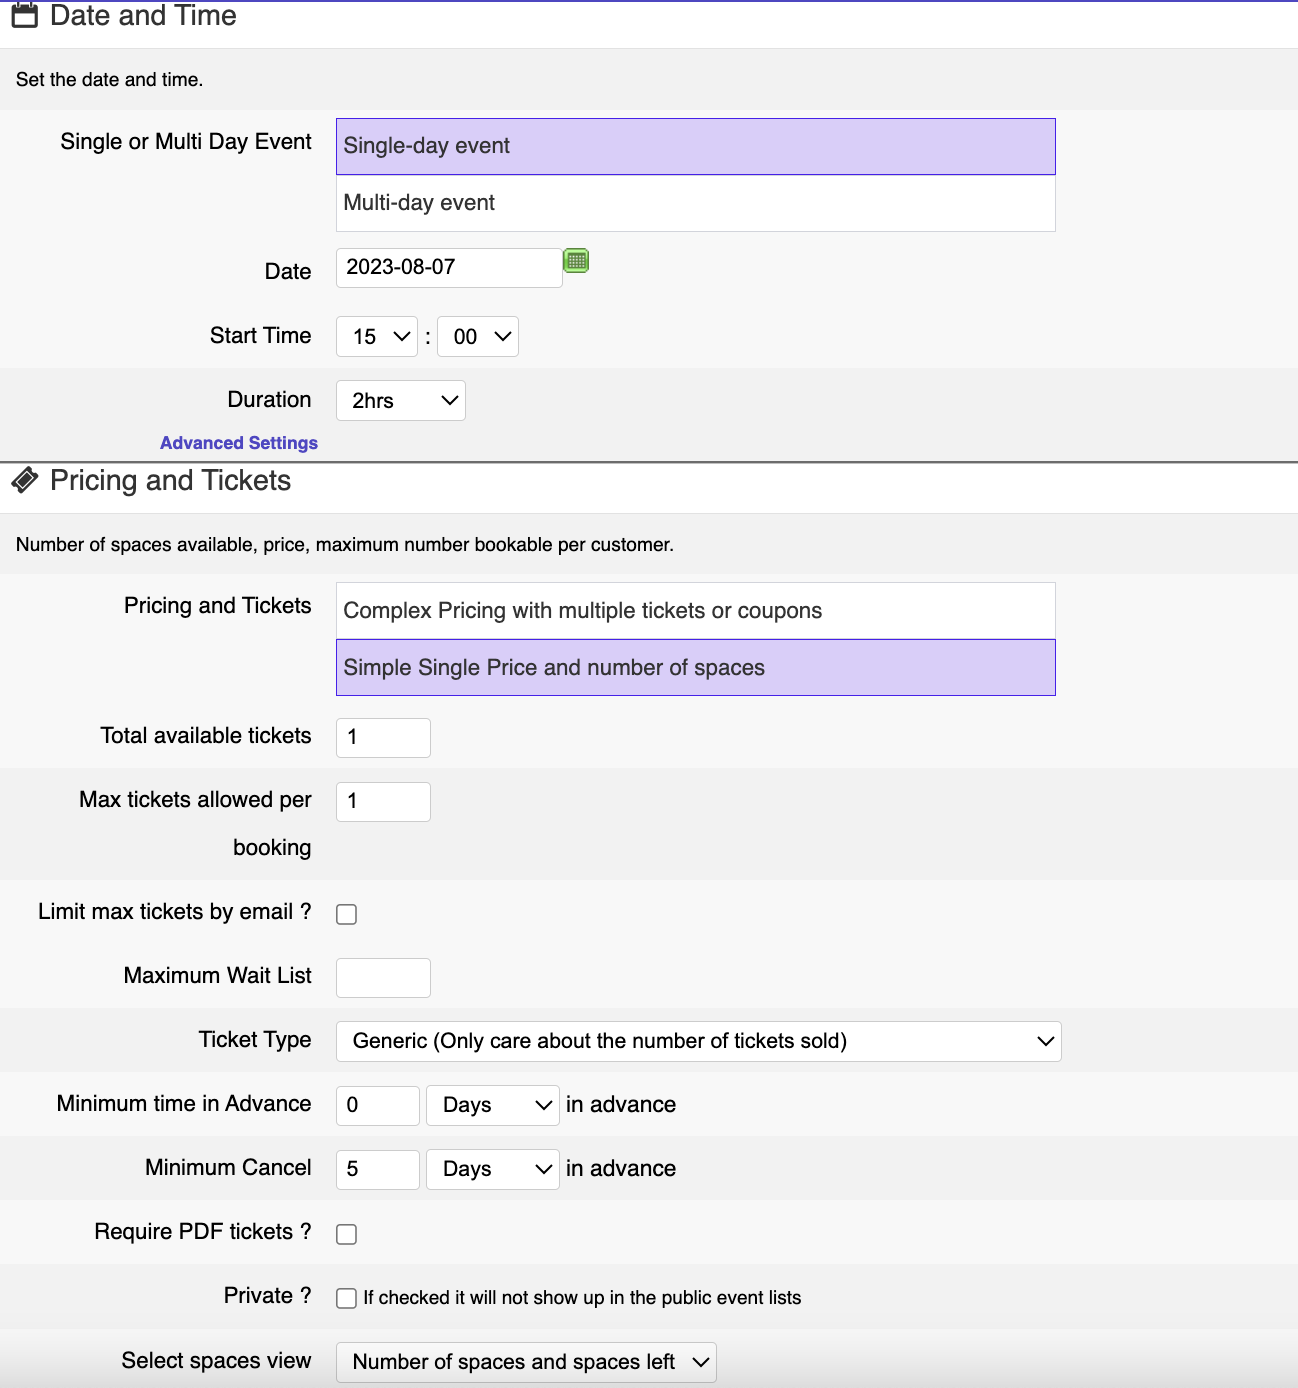
- Pricing & Tickets: In this section, you can customize how you would like your tickets to be made available. You can set the number of tickets available and the number of tickets that can be acquired in one booking (you can also ensure that not more than allowed tickets are bought by checking an attendee email address- "Limit max tickets by email").
Here you can also set the maximum number of attendees who can sign up for the waitlist, select a ticket type, or set a min/max advance time for canceling tickets.
If the ticket should be added as a pdf to the confirmation email, please check "Require PDF tickets".
Under "select spaces view" you can select the information that should be displayed per event on the events booking journey.
- Total available tickets: This is the total of available tickets or spaces for an event
- Price: this is the price of the ticket to attend the event
- Max tickets allowed per booking: This is the maximum number of tickets a customer is allowed to purchase
- Maximum waitlist: This is the max number of customers that can be added to the waitlist
- Require PDF tickets: If selected, a pdf ticket will be added to the event registration email sent out to customers
- Private: If selected, this event will be a private event and won’t display on the events journey
- Select spaces view: Choose which information about an event can be seen on an events card on the events overview page
- Resource (If applicable): If you have enabled (multiple) resources in the advanced settings, you can select to which resource you want to tie that specific event.
- Location (If applicable): If no resources are tied to the event, you can select from existing addresses/locations or add a new address for the event.
- Question set: If you want your customers to answer specific questions when they sign up for the event, you can select the question set here. The questions itself are set up in Studio under Studio → Customize → Booking Journey → Booking questions
Event groups
Event group lets you group similar events together so that customers can filter the list of events in the events booking journey and find the event they are interested in more easily.
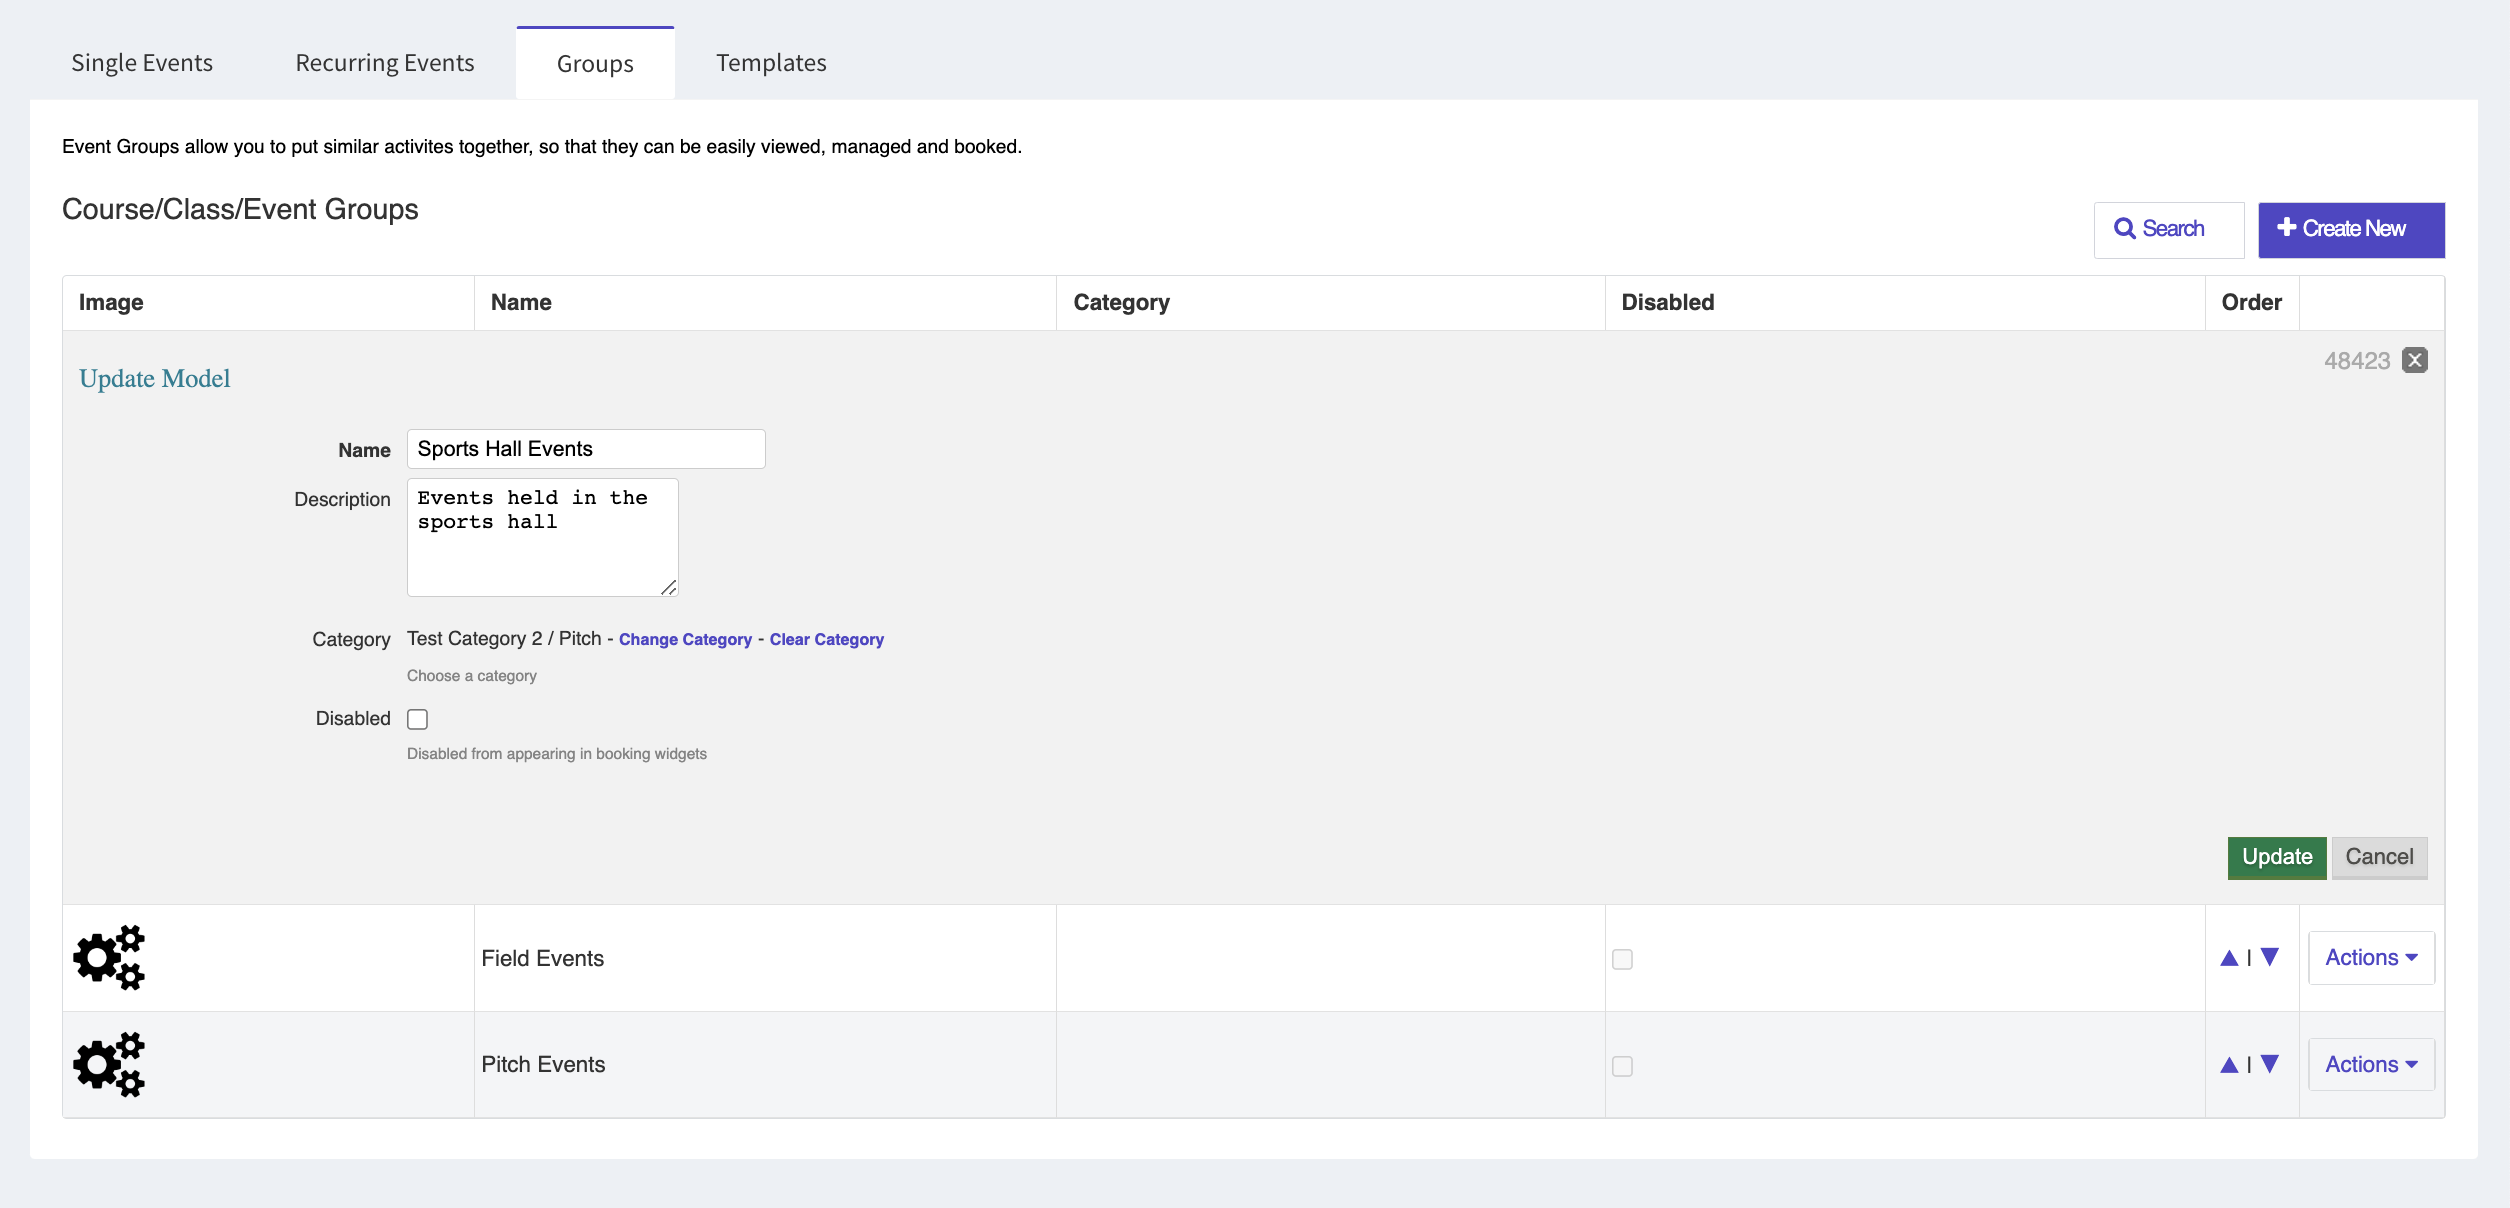
To use event groups,
- Navigate to Events → Groups tab, and create an event group by providing a title, description (optional), and an image(optional).
- Optionally, you can collect groups together under a category.
- In the event creation form, select your desired group from the group selection dropdown to assign the event to that specific group. If an image is not uploaded for the event.
Managing attendees
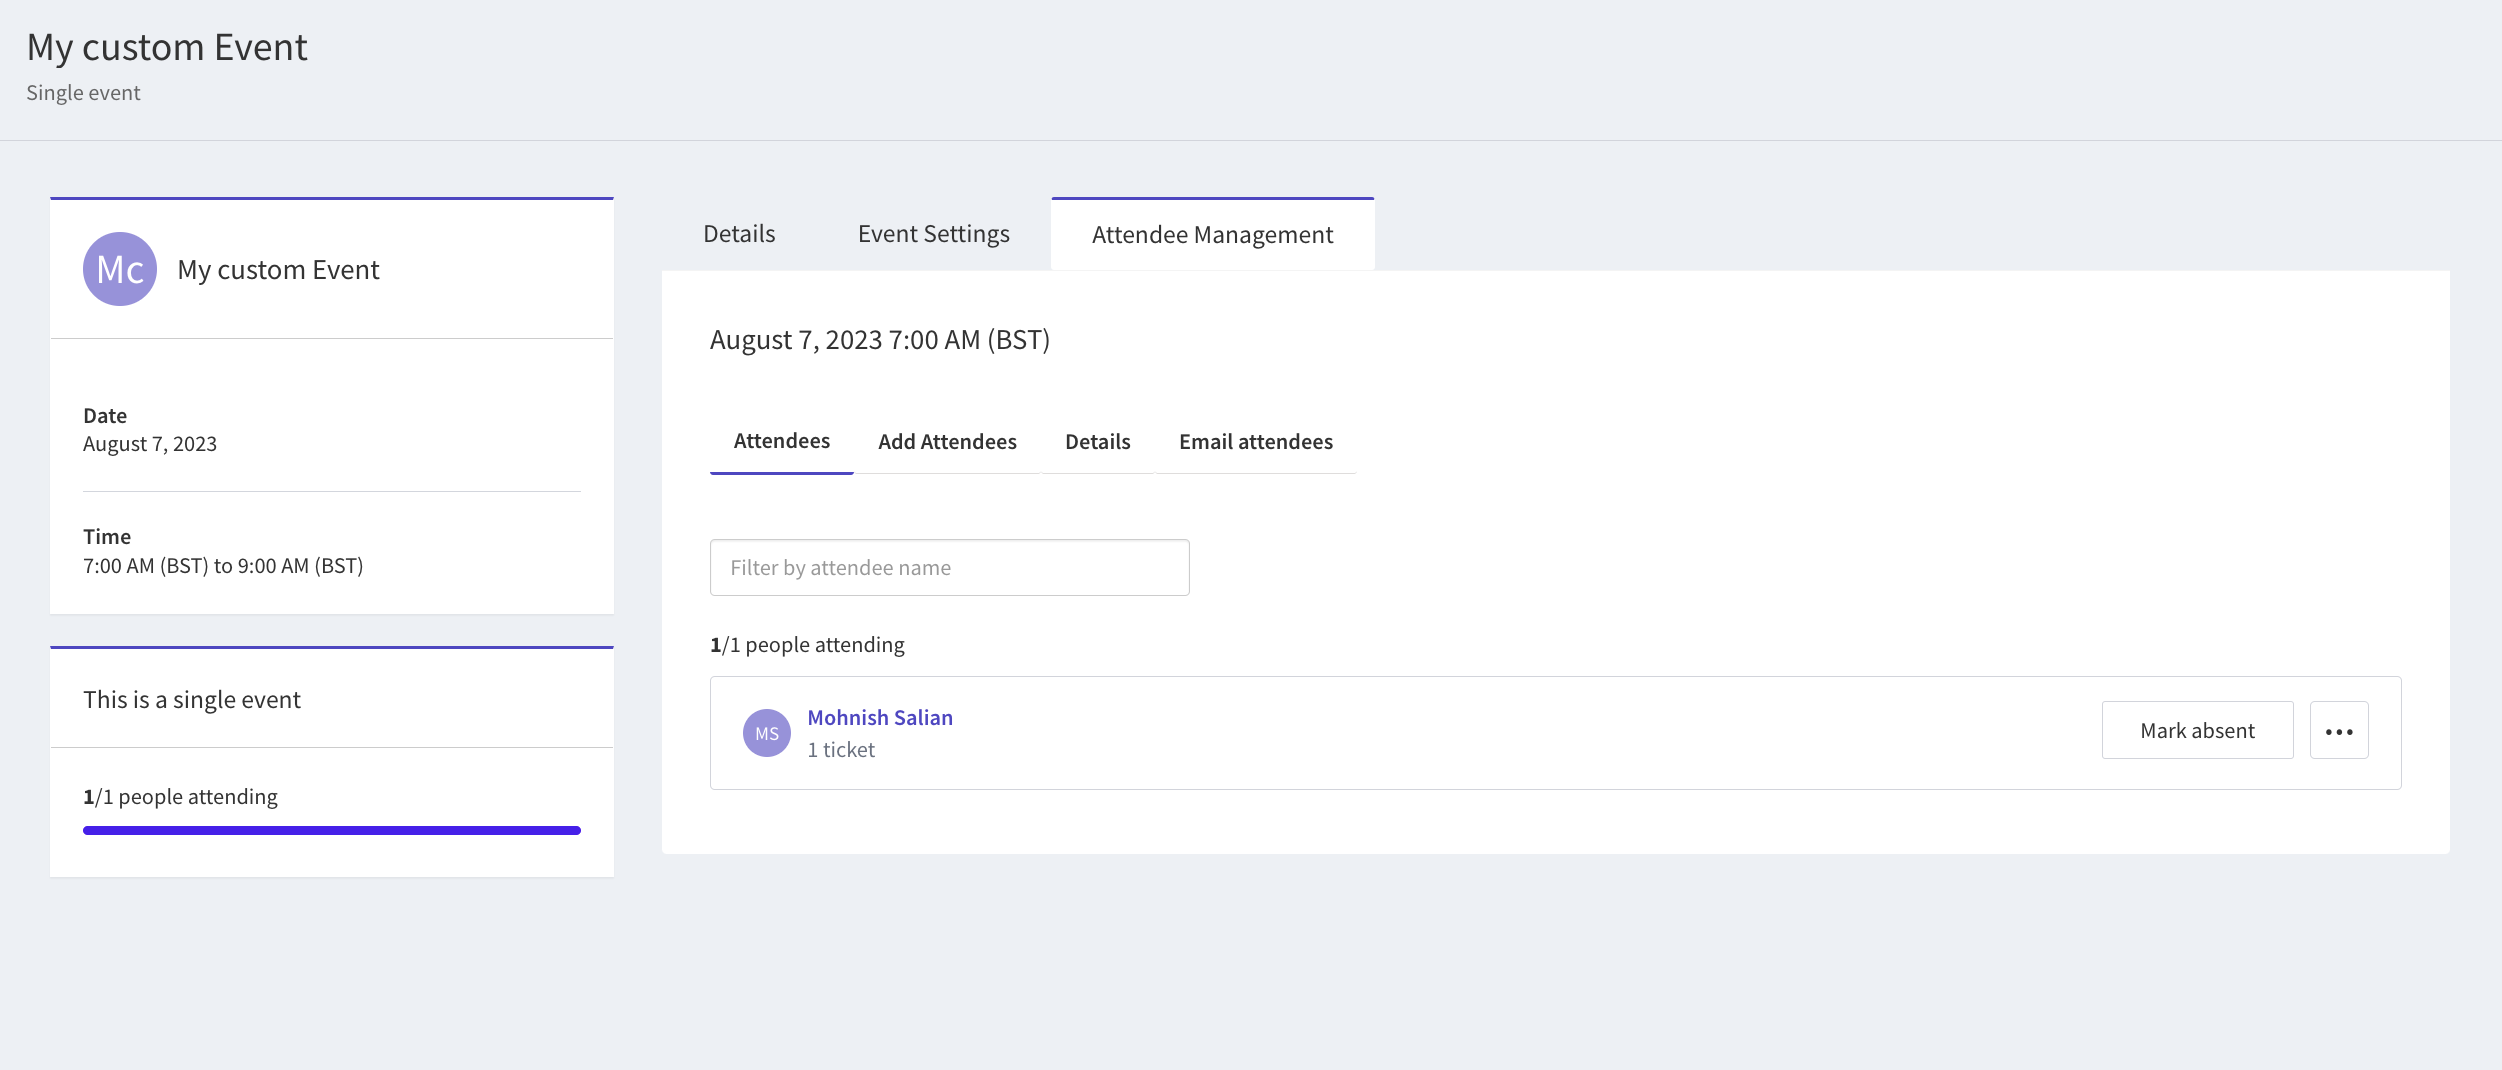
To manage attendees, navigate to the Attendee Management tab inside an existing event.
To add an attendee, go to the 'Add Attendees' tab and click on 'Add Single Date Attendee.' Fill out the form and click 'Create' to proceed.
You can view the list of attendees in the ‘Attendees’ tab where you can mark their attendance status, edit their details or remove them from the event.
By default, all attendees will be marked as present. You can change this setting under Basic settings → Events → Attendance.
Under the E-mail attendees tab you can send out an email to all attendees, just input a subject line and email text.
Bulk action: To perform bulk action on attendees, select the attendees by clicking on the checkbox on the left, then click on the dropdown at the bottom of the page and choose an action.
Download attendees list: To download the attendees list in CSV format, click on the export button, select the desired fields for the CSV file, configure additional options, and click ‘Export’ to generate the file.
Event landing page
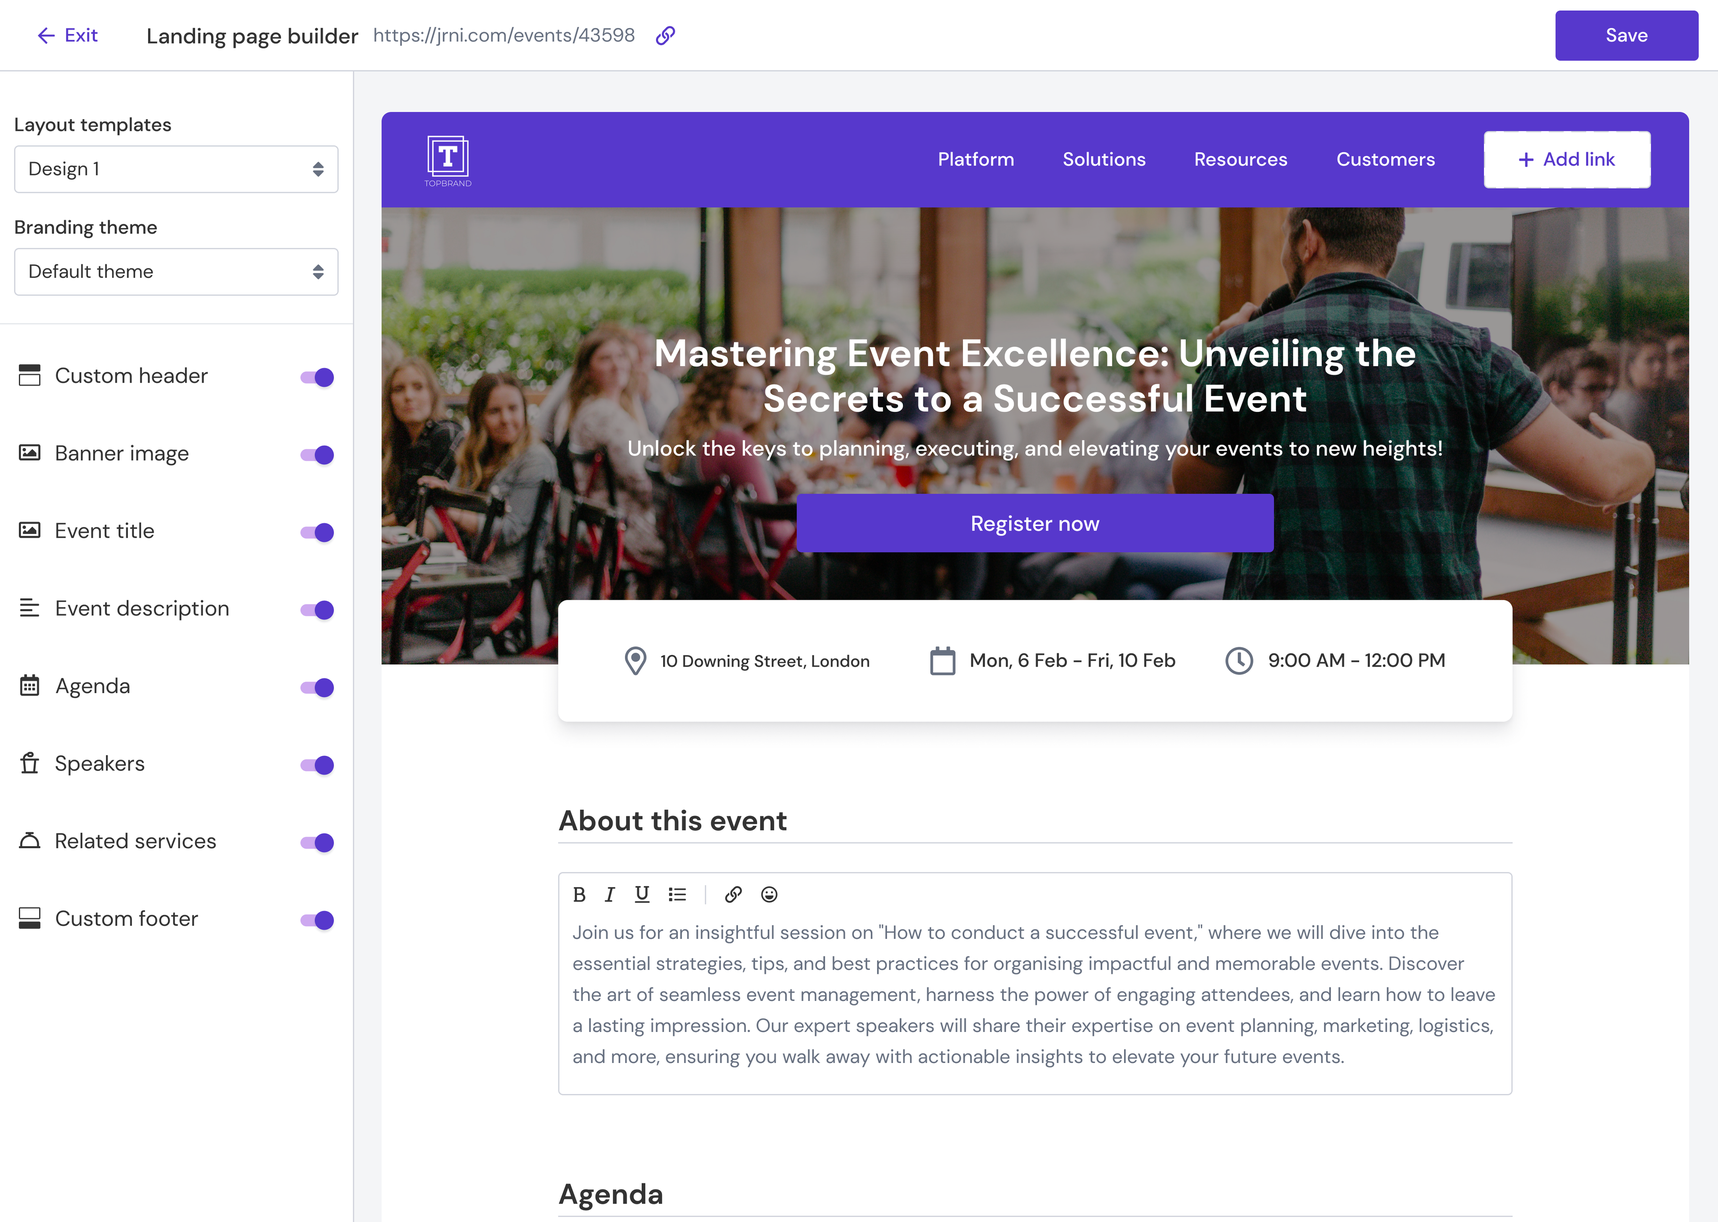
The landing page builder for events is a powerful feature that allows you to create customizable pages for the events that you offer on our platform. With our user-friendly interface, you can effortlessly design a personalized landing page for your event, showcasing your brand in style. Easily promote your event through social media and various marketing channels, ensuring maximum exposure and attendance.
For all details please view the Landing page builder guide.
Additional features
Exporting events
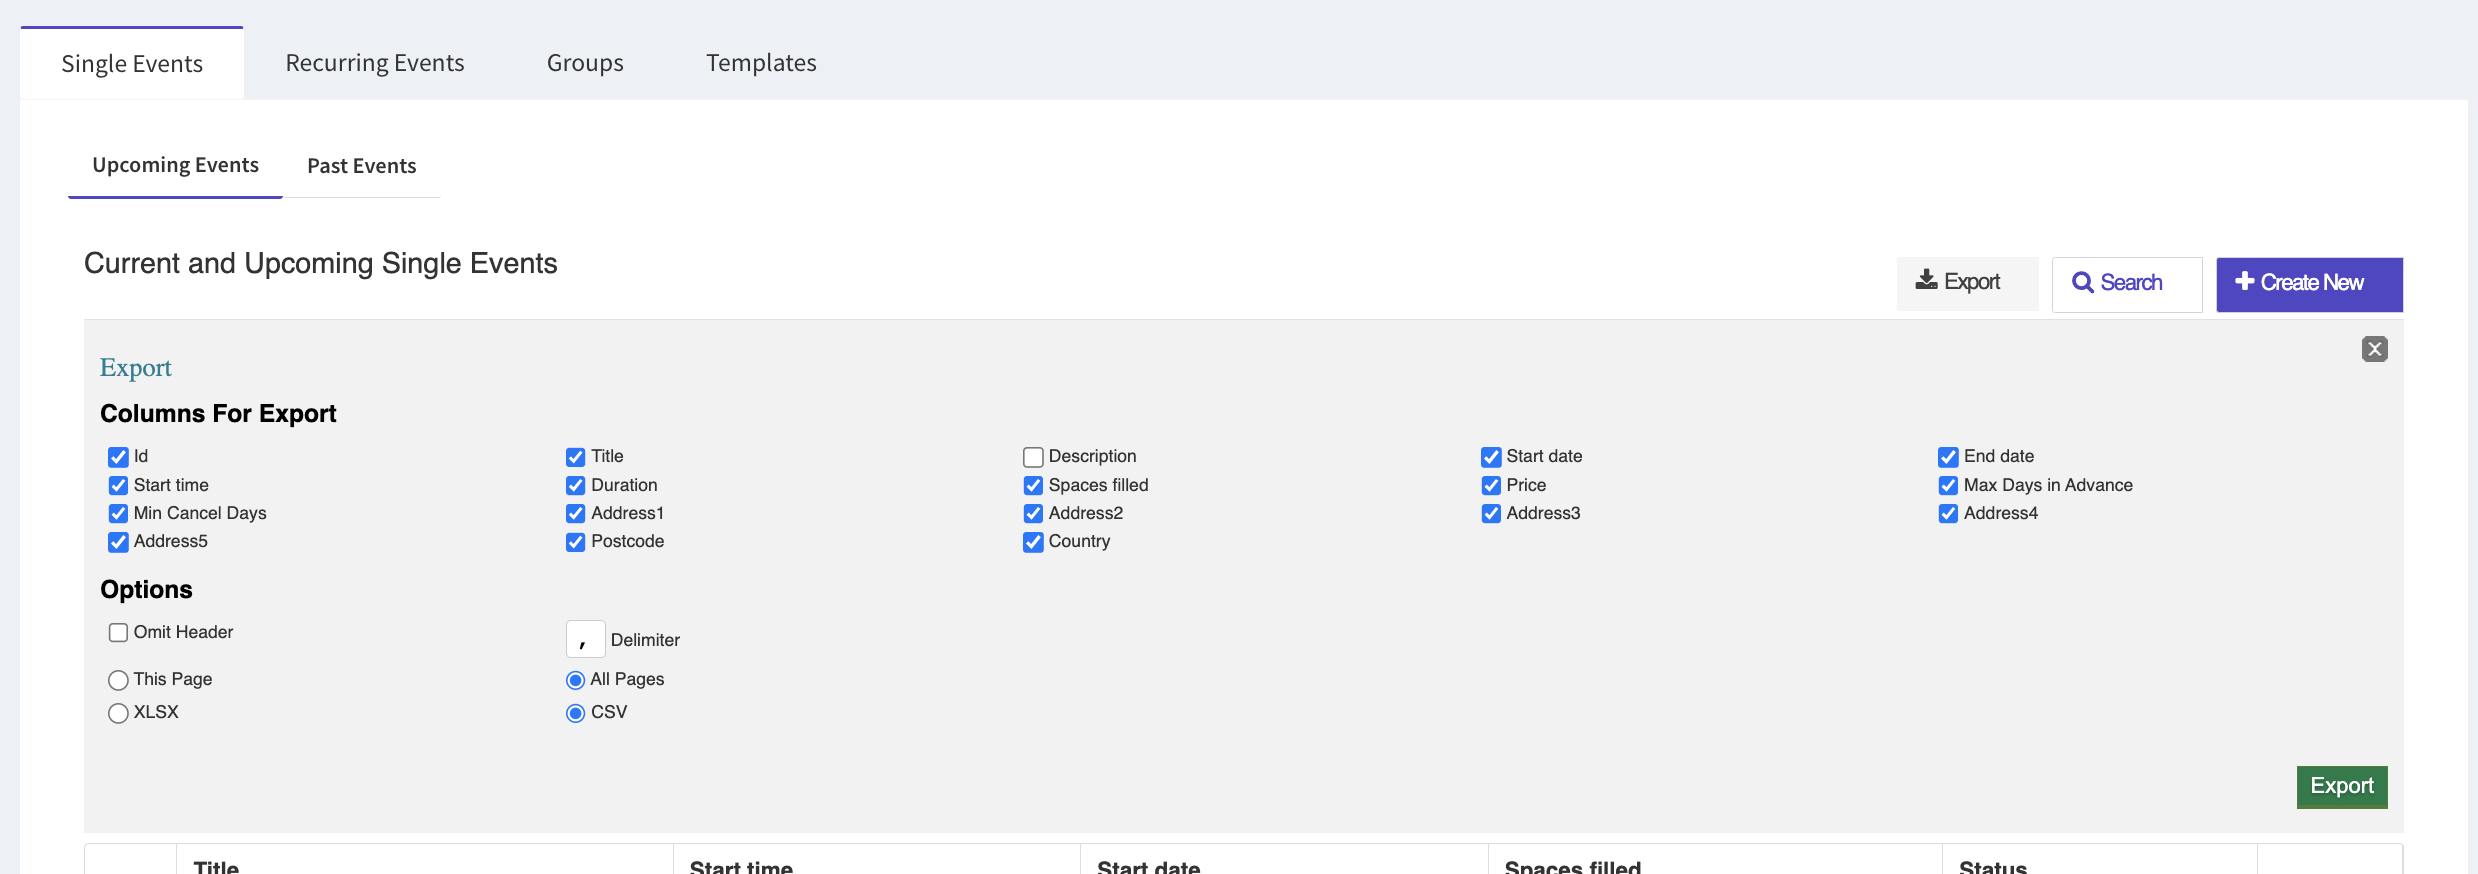
You can export a list of all single events or recurring events by clicking on the export button. A dialog box will open that allows you to check which fields you would like to export and how you want to export them.
Copying events
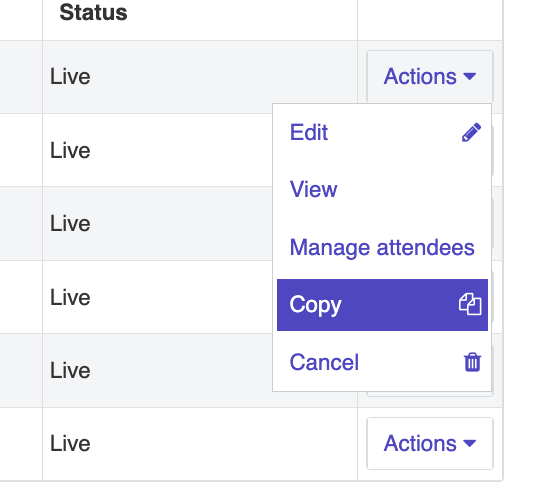
To speed up the creation of similar events, you can copy an event by selecting that option in the actions dropdown. It will create the exact same event on the same date & time in the disabled state. To go live with the event, take it active (with the green button at the bottom of the form) first and the click on the "create" button.
Updating events
To update an event using the Studio UI, under ‘Your Business’ from the left-hand navigation menu and select ‘Events’. This will display all the events within the location you are logged into. Select the ‘Actions’ button to update an existing event and press ‘Edit’.
The edit button will take you to the original screen when you initially created the event. Make any changes required to the event and press the ‘Save’ button to save the changes. Any changes made to the event will be directly reflected in the customer journey in real-time.

Deleting events
To delete an event using the Studio UI, under ‘Your Business’ from the left-hand navigation menu and select ‘Events’. This will display all the events within the location logged into. Select the ‘Actions’ button to delete an existing event and press ‘Delete’.
When an event is deleted, this change is reflected in the event's customer journey in real-time. The event is removed from the events list page and is not bookable by the end customer.
